Sunday 19 April 2015

Install Android Studio in Ubuntu

Many Android developers like me switch to Android Studio from Eclipse for better performance and integration. Android Studio has many new features that can speed up your android development.

Many times Eclipse hangs and we need to kill and and start again but this does not happen in Android Studio. Android Studio also has some nice preview when you creating layouts for the app. It has gradle support which eliminate the mess of including the libraries.

At start, you found Android Studio somewhat difficult but once you use it for few days, you will never go back to Eclipse(My personal experience!). The reason behing the difficulty of Android Studio is that the project structure and android project is totally different from Eclipse. But you got it easily after few days. Follow this thread if you need more info. on Android Studio and Eclipse difference.

Now get back to our tutorial, how to install Android Studio in Ubuntu. Currently I have Ubuntu 14.10 and Android Studio is working completely fine. Follow the below steps.

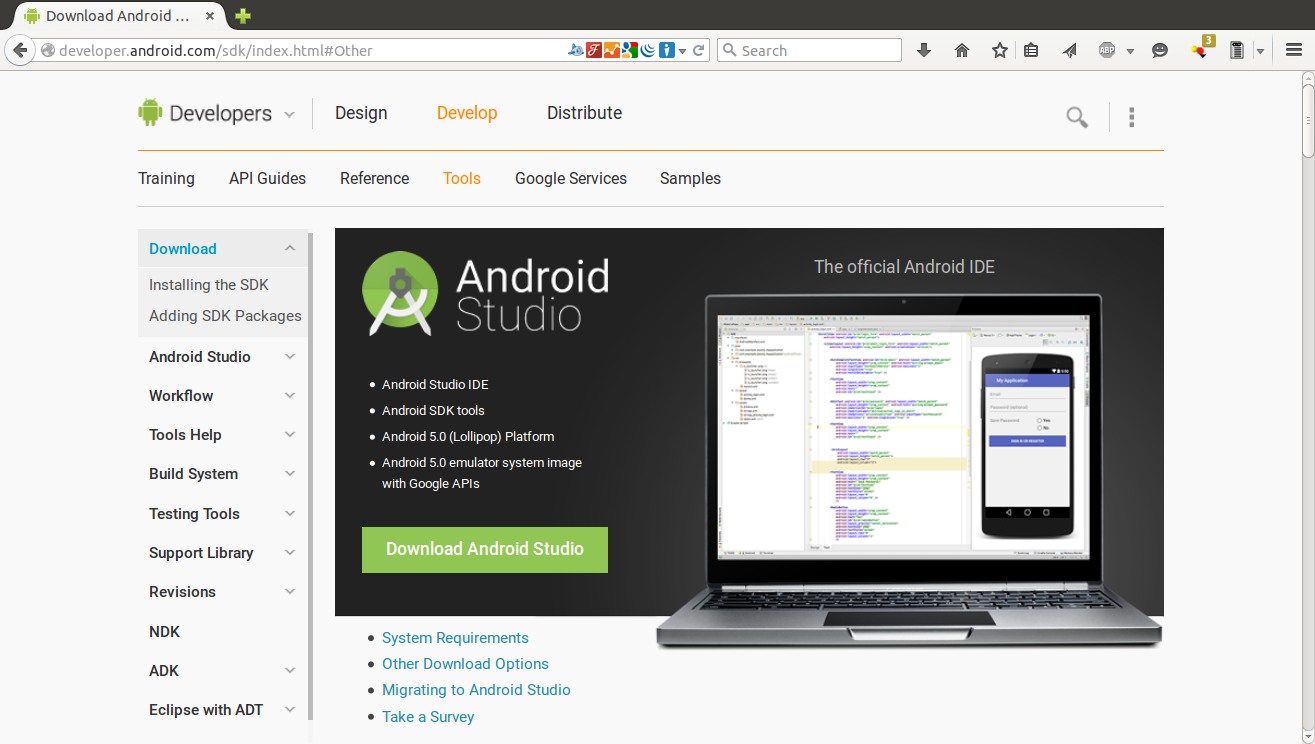
1. Download Android Studio from Google

You can find the latest version of Android Studio from official Android website here.

Download: https://developer.android.com/sdk/index.html


Now go to bottom of the page and find section "All Android Studio Packages" and download .zip file of Linux Platform.


2. Extract the .zip file into your hard drive and run from Terminal.

Now you have to extract the downloaded .zip file of Android Studio to one of your folder in hard drive. Now to run Android Studio for first time you need to run the .sh file from /bin folder from terminal. Below screenshot gives you the idea about that.


And it will open the Android Studio.

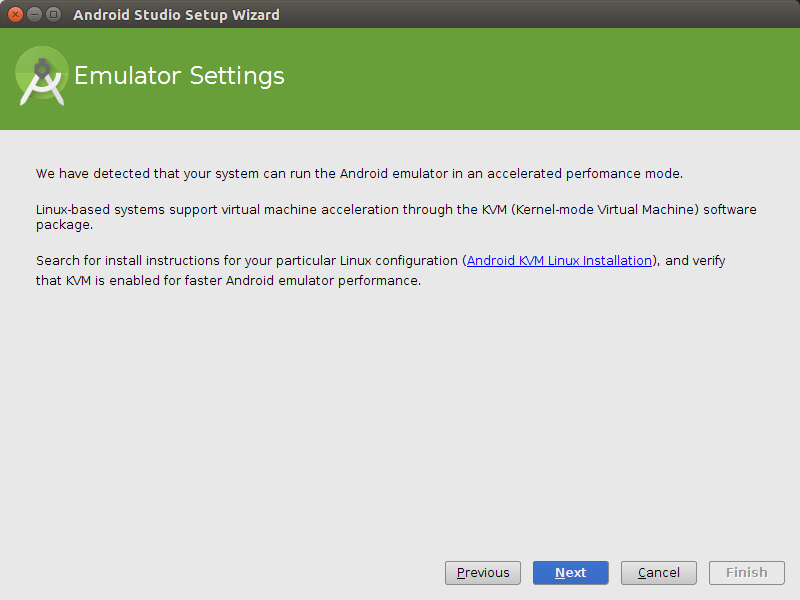
Now it will ask you for few preference and then at last it will ask to download some Android SDK component in case of you don't have them already. Follow the screenshots.


3. Create launcher icon for Android Studio.

Once you open android studio from terminal as per above instructions, you can create launcher icon following way. 

Go to Tools menu or press "Alt+t" from your keyboard. It will open Tools menu where you can find "Create Desktop Entry..." option. Please select it and confirm that you want to create launcher icon for android studio. After that open your dash by pressing master key(windows key) and you can find android studio icon there.


Friday 10 April 2015

Adjust screen brightness in Ubuntu using hotkeys

In almost all laptops you can find hotkeys(combination of function and other special key in your laptop that varies according to the manufacturer) that provide you special features like adjust sound, adjust brightness, toggle wifi and bluetooth. Now when you install Ubuntu in such laptop many time all hotkeys combination may not work.

I have Acer aspire series laptop and I installed Ubuntu in it. All the hotkeys combinations are working fine except brightness hotkeys using function key. But I can alter screen brightness using following command in terminal. 


        sudo setpci -s 00:02.0 F4.B=xx

In above command xx= all hexadecimal value between 00 to ff [00=highest brightness  ff=lowest brightness(total dark)]. For more information check my post http://daksh21ubuntu.blogspot.in/2011/12/how-to-increasedecrease-brightness-on.html


But for that you need to remember this command or need to write down it somewhere and enter it every time you start Ubuntu. So the hotkeys will be more preferrable over this solution.

For that you need to edit grub file. To open that grub file enter the following command in the terminal.

        sudo gedit /etc/default/grub

It will ask for the password of you user and it open gedit with grub file. You need to find two variable and add their value as below. If the variables are already there just mark them as comment by writing # at the start of the line.

    GRUB_CMDLINE_LINUX_DEFAULT="quiet splash acpi_backlight=vendor"


    GRUB_CMDLINE_LINUX="acpi_osi=Linux"

Save the file and close it. Now you have to update the changes in grub file by firing following command.

        sudo update-grub

Now when you restart the Ubuntu and open it next time, the hotkeys for brightness should be work fine. 

Friday 3 April 2015

Sublime Text: Awesome text editor in Ubuntu

As a Android developer many times I need to do some coding in PHP and I use gedit(default text editor in Ubuntu) which has nice syntax highlighting. But somewhere it is not specially designed for PHP.

So I searched for any specific text editor which supports all PHP function and syntax. And at last I found Sublime Text is one of the best text editor for it. Because it has many advance feature apart from PHP sytax highlighting. It has many great features like finding keyword in the code, replacing texts, formatting the code, proper indention, etc.

As you install it and use it for some time, you will come to know about many other handy features. I will guarantee you that you can adopt it in 1 one or two days. You can also change the theme of editor that changes syntax color and background color.

The best feature I haven't seen in any other text editor is the right panel in Sublime Text which indicates you many things like length of your code, selection(if you select more than one page, it shows you how much part is selected so you can get some idea), current position of your cursor in the file which helps you when you have very lengthy file.

The lastest version 3 is just released and work awesome. Here is the screenshot tour of Sublime Text.


Wednesday 7 May 2014

New Mozilla FireFox 29 in Ubuntu [Screenshot Tour]

Recently Mozilla has announced their 29th version of Firefox with all new design and dashing layout and curvy tabs and menu like Google Chrome. I personally found this new look very cool and clear. And they also have some improvement in performance.

You can check release notes for Mozilla Firefox 29 here : http://www.mozilla.org/en-US/firefox/29.0/releasenotes/

Here is the screenshot tour for this.


Thursday 31 October 2013

Screenshot tour of Ubuntu 13.10 Saucy Salamander

Here is the screenshot tour for the Ubuntu 13.10 Saucy Salamander. Ubuntu 13.10 comes with great look and some improved design. Upgrade or download and enjoy Ubuntu 13.10 !!!


Thursday 18 July 2013

Mogrify : An ImageMagic command line tool for various Image operation in Ubuntu

Mogrify is the command line tool from ImageMagic and used to do various image operation from terminal. So it is widely prefer by the designer who need to do batch operation. I came to know about this tool when I need to scale, change the quality and to change the format of the number of images during my Android development. In Android, you need to build 4 types of images of this ratio 3:4:6:8. So it helps me a lot.

Hence I'm writing some useful commands and provide reference to their guide for detailed imformation.

Resize an image : 
  • mogrify -resize 75% image.jpg     [resize it to 75% of its current resolution]
  • mogrify -resize 256x256 image.jpg     [resize it by 256x256 of fix resolution]

Change the format of an image : 
  • mogrify -format png image.jpg     [convert image.jpg to image.png]
  • mogrify -format png *     [covert all image to png format in current directory]

Change the quality of jpg image : 
  • mogrify -quality 50 image.jpg     [downgrade the quality of image by half]

Rotate an image : 
  • mogrify -rotate 90 image.jpg     [rotate image clockwise by 90 degree]

Strip metadata and comments : 
  • mogrify -strip image.jpg     [use to strip all metadata - mainly used to reduce the physical size of an image]


There are many others command which used to do other things with images. The main benefit of this tool is that you can easily use it for batch processing using * at place of your image name. It takes all the files in present directory.

Here is the reference where you can find each command with detail.

Mogrify : http://www.imagemagick.org/script/command-line-options.php


Sunday 24 February 2013

How to get Hex code of any Color using GIMP in Ubuntu

First open GIMP using Unity dash or type gimp command in terminal [ctrl + alt + t]. Then open Toolbox if it is not open using 'Windows -> Toolbox' or press Ctrl + b. Now click on background and foreground color as shown in following figure.


Now in new dialog box, click on eyedropper as shown in following screenshot.


Then click on the object from where you need to get hex code of color. It will display the hex code of selected color on left textbox.


Here is the video of it for more detail.

Sunday 2 December 2012

How to install Joomla 3.0.1 on Ubuntu 12.10

In this tutorial, you can learn how to install Joomla 3.0.1 on Ubuntu.

Version of the software we used in this tutorial.
  • Ubuntu 12.10
  • Joomla 3.0.1
  • XAMPP 1.8.1
Here is the video for it.


First download and extract Joomla .zip file [example - 'Joomla_3.0.1-Stable-Full_Package.zip'] to your htdocs folder or your linked folder to htdocs.

    unzip Joomla_3.0.1-Stable-Full_Package.zip -d joomla


Then make its permission to executable [755 or 777].

    sudo chmod -R 777 joomla

Then in browser, open your folder in htdocs in URL. Here is 'http://localhost/joomla'. It will prompt you the following screen.


In first phase "Configuration", you have to provide information like site name, email username and password of administrator. Then click next it will give you the following page.


In second phase "Database", enter the details of your database like database name, hostname ['localhost' if local machine], username, password and prefix for tables and click next. It will give you the following page.


In third phase of "FTP", skip this phase initially you don't need to setup this settings at this time. Just click next will show you the following page.


For beginners, it is recommended to install any of the sample data in "Overview" phase and click next. It will start creating database and install sample data to your server as shown in picture.


After installing it will show you the following page. In which they show the option for remove installation directory so that every time it does not open.


Now remove installation directory by clicking on yellow button or manually. In Ubuntu if you do not change permission to 755 or 777 then it might happen you do not remove this directory from here because it needs root access, so in that case remove it from terminal using 'sudo rm -rf' command.


Noe you can see your homepage by clicking on site or giving path of your joomla directory. You can also access administrator area called joomla control panel by clicking on administrator or your path to joomla directory and then type '/administrator', it will prompt for username password which is already set in the first 'main configuration' phase.

This is th homepage of website.


This is administrator area of website.


After successfully login it will show you the control panel.


Sunday 18 November 2012

How to calculate Checksum of any file in Ubuntu

In this tutorial, you can learn how to calculate checksum of any file in Ubuntu. Checksum is used to check the file is same or not. If checksum is matched at both ends than your file is correct. There are many types of algorithm you can use for calculating checksum. Most used are md5, sha1, sha256, sha384, sha512.

Now you can watch the video of it or follow the steps given below the video.


First open your terminal and goto your directory where your file is stored. Then first write name of checksum algorithm you want to use following the filename.

If your filename is 'name.pdf' then the various checksum can be calculate by following commands.

    md5sum name.pdf

    output : <checksum value> name.pdf

    sha1sum name.pdf

    output : <checksum value> name.pdf

    sha256sum name.pdf

    output : <checksum value> name.pdf


    sha384sum name.pdf

    output : <checksum value> name.pdf


    sha512sum name.pdf

    output : <checksum value> name.pdf

See the above video for more information.

Friday 19 October 2012

How to install Ubuntu 12.10 [Screenshot Tour]

It takes less than 15 minutes to install. Here is the screesnshot tour of the installation of fresh Ubuntu 12.10.